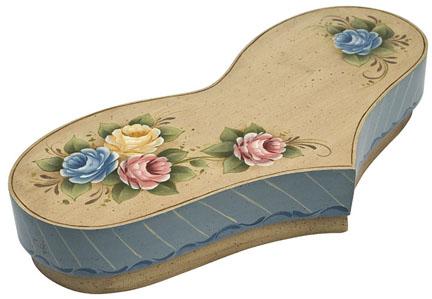
Heart and Roses de Marlene Kreutz
DecoArt
Americana Acrylics
DAO3 - Buttermilk
DAO27 - Gooseberry Pink
DAO40 - Williamsburg Blue
DAO58 - Antique White
DAO86 - Uniform Blue
DAO88 - Charcoal Grey
DAO93 - Raw Sienna
DAO94 - Mississippi Mud
DAO97 - Rookwood Red
DA113 - Plantation Pine (semi-opaque)
DA147 - Antique Green
DA168 - Golden Straw
DA180 - Asphaltum
DA185 - Light French Blue
Control Medium
DAS11 - Control Medium
Wood Sealer
DS16 - Americana Wood Sealer
Americana DuraClear Varnishes
DS21 - DuraClear Satin Varnish
Supplies Surfaces
3/4" flat brush
#10/0 script liner brush
#2 round brush
#8 and #10 shader brushes
#6 chisel blender brush
Sandpaper
Water container
Palette paper
Paper towels
Old toothbrush
Graphite
Elongated heart box, Valhalla Designs, P.O. Box 3006, 122 Fir St., Myrtle Creek, OR 97457; www.valhalladesigns.com
Instructions
Color Mixes
Light Green mix: Buttermilk + Antique Green 2:1
Medium Green mix: Buttermilk + Antique Green 1:1
Dark Green mix: Antique Green + Plantation Pine 1:1
Preparation
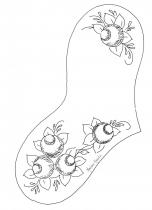
Sand, seal with Americana Wood Sealer, and resand box. Use 3/4" flat brush and base top surface of box and bottom with Antique White. Antique box top and bottom with Control Medium and Mississippi Mud (2:0). Brush on quickly with 3/4" brush and wipe back with paper towel. Flyspeck with Asphaltum: use old toothbrush; thin paint slightly and run thumbnail over bristles. Allow to dry and trace on pattern.
Leaves
1. Use #6” chisel blender brush and basecoat leaves Antique Green. Let dry.
2. Using #8 flat brush, float dark areas and create vein lines with Dark Green mix (see above). This will need to be repeated.
3. Using #8 flat brush, float highlight opposite of dark vein line and tips with Medium Green mix. Repeat 2 or 3 times to build up light.
4. Reinforce highlight with Light Green mix. (This will also need to be repeated.) Reinforce shading in deepest shadow areas with Asphaltum.
Roses
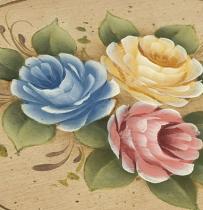
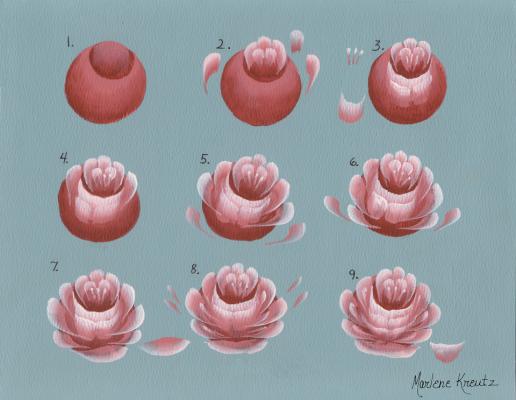
Most petals consist of double-loaded comma strokes made with #8 flat brush. It is important to allow space between strokes so that background color shows through.
Double-load brush with medium-value color and light value; blend on palette to soften colors together:
1. Yellow Rose: Light value: Buttermilk; medium value: Golden Straw; dark value: Raw Sienna
2. Blue Roses: Light value: Buttermilk; medium value: Williamsburg Blue; dark value: Uniform Blue
3. Pink Roses: Light value: Buttermilk; medium value: Gooseberry Pink; dark value: Rookwood Red
Step by Step Stroke Instructions
1. (See step by step detail below.) Basecoat circle with medium value color. Shade underside of circle and inside of cup with darker value color.
2. (These strokes are inside cup.) Back row consists of left comma stroke, flat stroke in middle, and right comma stroke. Next row consists of two flat strokes in center.
3. Stroke under cup is laying-down "C" stroke with one or two strokes under it.
Inside cup has three stamens, set down with chisel edge of double-loaded brush.
4. First set of petals is left and right comma stroke on each side of circle.
5. Second set of petals is left and right comma stroke with this being widest part of
rose.
6. This is third set of petals: a left and right comma stroke and should be tucked under the second set.
7. Bottom of rose should be thin, thick, thin stroke, light to bottom.
8. These are small filler comma strokes, varying with each rose.
9. This is laying-down "C" and is used to fill in front above bottom lip, light to top.
Finishing Touches
1. Use #10 flat brush and float background shading between leaves and under roses in deepest shadow areas with Mississippi Mud.
2. Using liner brush, add tendrils and filler leaves with Antique Green.
3. Use #2 round brush and add comma strokes with Mississippi Mud.
4. Line around top of box with Charcoal Grey.
5. Use #10 flat brush and base edge of lid with Light French Blue.
6. Line band with parallel, diagonal strokes of Buttermilk.
7. Use #2 round brush to add row of comma strokes around bottom edge of lid.
8. Use #10 flat brush to apply wash of Uniform Blue on edge below these strokes.
9. Let dry and varnish with DuraClear Satin Varnish.
Date de dernière mise à jour : Lun 05 juil 2021
